前言
本文涉及的代码全由博主自己完成,可以随意拿去做参考。如对代码有不懂的地方请联系博主。
相关代码以同步至github(2024/1/23):issey_Kaggle/Bert_BiLSTM
博主page:issey的博客 -
愿无岁月可回首
本系列文章中不会说明环境和包如何安装,这些应该是最基础的东西,可以自己边查边安装。
许多函数用法等在代码里有详细解释,但还是希望各位去看它们的官方文档,我的代码还有很多可以改进的方法,需要的函数等在官方文档都有说明。
简介
本系列将带领大家从数据获取、数据清洗,模型构建、训练,观察loss变化,调整超参数再次训练,并最后进行评估整一个过程。我们将获取一份公开竞赛中文数据,并一步步实验,到最后,我们的评估可以达到排行榜13 位的位置。但重要的不是排名,而是我们能在其中学到很多。
本系列共分为三篇文章,分别是:
上篇:数据获取,数据分割与数据清洗
中篇:模型构建,改进pytorch结构,开始第一次训练
下篇:测试与评估,绘图与过拟合,超参数调整
本文为该系列第二篇文章,在本文中,我们将学习如何用pytorch搭建我们需要的神经网络,如何用pytorch lightning改造我们的trainer,并开始在GPU环境我们第一次正式的训练。在这篇文章的末尾,我们的模型在测试集上的表现将达到排行榜28 名的位置。
注意:本文不会写到训练好的模型读取与测试集测试,这将在下一篇文章详细说明。
模型、优化器与损失函数选择
神经网络的整体结构
预训练:我们将使用Bert对我们的text构建Word Embedding(词向量)。
关于什么是word embedding,这是nlp最基础的知识,在斋藤康毅的《深度学习进阶:自然语言处理》中,有详细说明,这本书很好,强烈推荐作为入门书籍 。什么是bert,各位可以自行百度。前置知识太多,哪怕是简要说明,也要写一大堆。本文的重点在于实战而非理论学习,如果对这方面感兴趣,这里推荐一个社区:hugging face。
下游模型:BiLSTM(双向LSTM)。
lstm是RNN的改进版,由于存在梯度消失和梯度爆炸问题,RNN模型的记忆很短,而LSTM的记忆较长。但lstm仍然存在梯度消失和梯度爆炸。近几年出现的transformer可以有效解决这个问题。transformer也是bert的前置知识之一。这里就不进行拓展了。感兴趣的读者可以尽情把lstm换成transformer,看看评估结果会不会更好。
关于RNN,在《深度学习进阶》一书中也有详细说明。
优化器选择
选择AdamW作为本次训练的优化器。
关于SGD,AdaGrad,Adam优化器,在斋藤康毅的《深度学习入门:基于python的理论和实现》 一书中有详细说明。AdamW是Adam的改进版本之一。
损失函数选择
选择Cross Entropy Loss作为损失函数。Cross Entropy Loss实际上包含了Softmax层的实现。这里不进行展开讨论。关于Cross Entropy Loss的详细实现也在《深度学习入门》一书中有详细说明。
需要导入的包和说明
1
2
3
4
5
6
7
8
9
10
11
12
13
import torchfrom datasets import load_dataset from torch.utils.data import Datasetfrom torch.utils.data import DataLoaderimport torch.nn as nnfrom transformers import BertTokenizer, BertModelimport torch.optim as optimfrom torch.nn.functional import one_hotimport pytorch_lightning as plfrom pytorch_lightning import Trainerfrom torchmetrics.functional import accuracy, recall, precision, f1_score from pytorch_lightning.callbacks.early_stopping import EarlyStoppingfrom pytorch_lightning.callbacks import ModelCheckpoint
说明:
torch : pytorch
datasets : 这个datasets指的是hugging
face的datasets 。关于hugging face请各位自行搜索教程。hugging
face是nlp领域知名的社区。
transformer:hugging
face的核心模块。搜索:如何安装transformer
pytorch_lightning:更好的管理你的pytroch流程。在《深度学习进阶》一书中,提到过Trainer用于管理训练流程,但是pytorch本身并没有实现Trianer。pytorch_lightning专为此而生。除此之外,它还为记录train_loss,val_loss,评估等提供了便捷的方法。详细的待会儿用到了说。
需要加载的数据与模型
Bert数据包:bert-base-cased
,为了方便的加载这个数据包,请在Pycharm中设置代理。如果连接不上,就自行搜索本地加载方法。
现在,让我们开始写代码吧!
第一部分:搭建整体结构
step1: 定义DataSet,加载数据
pytorch框架第一步:自定义数据集。如果这个有疑问,需要去看看pytorch基础。
1
2
3
4
5
6
7
8
9
10
11
12
13
14
15
16
17
18
19
20
21
22
23
24
25
26
import torchfrom datasets import load_dataset from torch.utils.data import Datasetfrom torch.utils.data import DataLoaderimport torch.nn as nnclass MydataSet (Dataset ): def __init__ (self, path, split ): self.dataset = load_dataset('csv' , data_files=path, split=split) def __getitem__ (self, item ): text = self.dataset[item]['text' ] label = self.dataset[item]['label' ] return text, label def __len__ (self ): return len (self.dataset) if __name__ == '__main__' : train_dataset = MydataSet('./data/archive/train_clean.csv' , 'train' ) print (train_dataset.__len__()) print (train_dataset[0 ])
解释一下load_dataset中的split,他是分割文档的意思,但是我们这里是从本地读取csv,文件格式并不是hugging
face
的标准。所以之后无论是验证集还是测试集,我们都统一填'train'。更多详情请访问官方文档。
输出:
1
2
55223 ('我妈大早上去买了好几盒维C维E,说专家说了每天吃能预防肺炎还要去买金银花,一本正经的听专家讲座,还拿个小本子记笔记也是很认真了?' , 1.0)
step2:装载dataloader,定义批处理函数
这个批处理函数主要做的事情是:使用bert-base-chinese对字典将我们的text进行编码,详细不展开拓展,请花时间去大致了解bert都做了些什么,bert如何使用。简单来说,bert每个模型自己有一个字典,我们映射text也是映射到它的字典上去。
如果字典上没有的字符,会映射成[UNK]。所以之前我们数据清洗时没有去除特殊字符。
其他的解释都在代码的注释里。
1
2
3
4
5
6
7
8
9
10
11
12
13
14
15
16
17
18
19
20
21
22
23
24
25
26
27
28
29
30
31
32
33
34
35
36
37
38
39
40
41
42
43
44
45
46
47
48
49
50
51
52
53
54
55
56
57
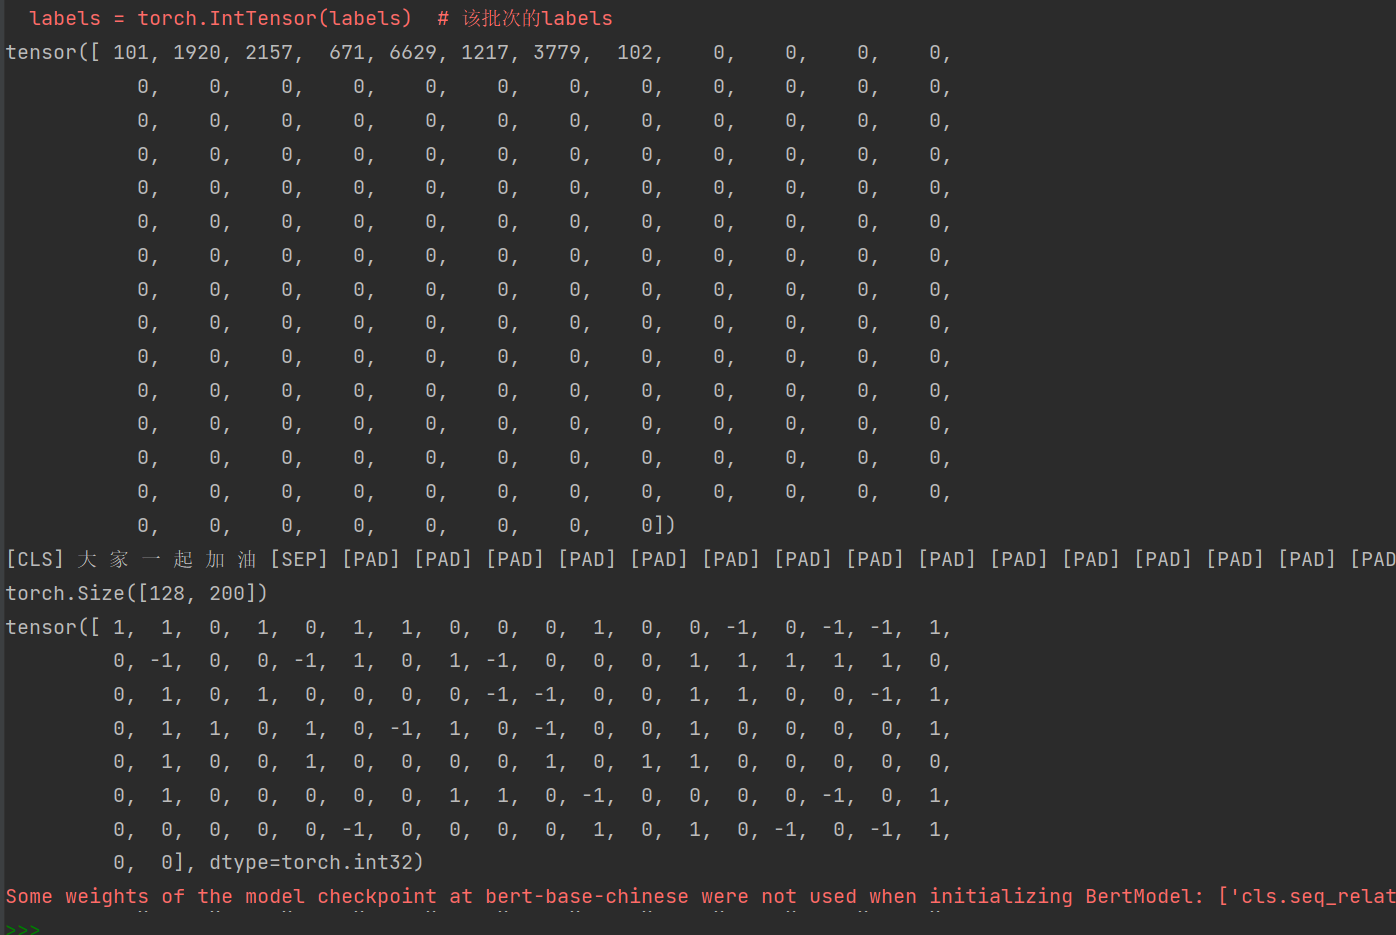
from transformers import BertTokenizer, BertModelclass MydataSet (Dataset ): ... def collate_fn (data ): sents = [i[0 ] for i in data] labels = [i[1 ] for i in data] data = token.batch_encode_plus( batch_text_or_text_pairs=sents, truncation=True , padding='max_length' , max_length=200 , return_tensors='pt' , return_length=True , ) input_ids = data['input_ids' ] attention_mask = data['attention_mask' ] token_type_ids = data['token_type_ids' ] labels = torch.LongTensor(labels) return input_ids, attention_mask, token_type_ids, labels if __name__ == '__main__' : batch_size = 128 epochs = 30 ... token = BertTokenizer.from_pretrained('bert-base-chinese' ) train_loader = DataLoader(dataset=train_dataset, batch_size=batch_size, collate_fn=collate_fn, shuffle=True , drop_last=True ) for i, (input_ids, attention_mask, token_type_ids, labels) in enumerate (train_loader): print (input_ids[0 ]) print (token.decode(input_ids[0 ])) print (input_ids.shape) print (labels) break
因为没有指定随机种子,每次结果可能不一样。需要注意的是input_ids.shape需要与批处理函数中的规则对应。
step3:生成层--预训练模块,测试word
embedding
这里就直接上代码了,pytorch基础部分不讲解。其他地方都在代码里有说明。
注意我们冻结了上游参数,这样bert层就不会更新参数了。当然你也可以试试微调。
1 2 3 4 5 6 7 8 9 10 11 12 13 14 15 16 17 18 19 20 21 22 23 24 25 26 27 28 29 30 31 32 33 34 35 36 37 38 39 40 41 42 43 44 class MydataSet (Dataset ): ... def collate_fn (data ): ... class Model (nn.Module): def __init__ (self ): super (Model, self).__init__() self.bert = BertModel.from_pretrained('bert-base-chinese' ) for param in self.bert.parameters(): param.requires_grad_(False ) def forward (self, input_ids, attention_mask, token_type_ids ): embedding = self.bert(input_ids=input_ids, attention_mask=attention_mask, token_type_ids=token_type_ids) embedding = embedding.last_hidden_state print (embedding) print (embedding.shape) if __name__ == '__main__' : ... ... model = Model() for i, (input_ids, attention_mask, token_type_ids, labels) in enumerate (train_loader): model.forward(input_ids, attention_mask, token_type_ids) break
这里我们一个batch_size是128。注意embedding.shape的输出,是[128,200,768]。代表128句话,每句话200个词,每个词被构建成了768维度的Word Embedding(词向量)。接下来,我们就可以把它们丢进LSTM层了。
step4:生成层--BiLSTM和全连接层,测试forward
于4.13日修改forward output输出
我们还在这部分选择了损失函数和优化器。
首先说明两个易错的点:
问题1:使用Cross
Entropy Loss到底需不需要在forward时经过softmax层?
关于这个问题的讨论:
python
- Should I use softmax as output when using cross entropy loss in
pytorch? - Stack Overflow
之前说了,Cross Entropy Loss本身已经实现了Softmax。所以forward时最后只需要经过全连接层就可以输出,当然你还可以再加一个Relu激活,我这里没有加。
问题2:bilstm最后时刻的输出应该怎么取?
先来看看bilstm的图。我们需要注意的是,output第一层由正向lstm第一时刻状态 和反向lstm最后时刻状态 拼接而成;而output最后一层则由正向lstm最后时刻状态 和反向lstm第一时刻状态 拼接而成。所以我们在forward时简单取output[:,-1,:]并不是正确的。
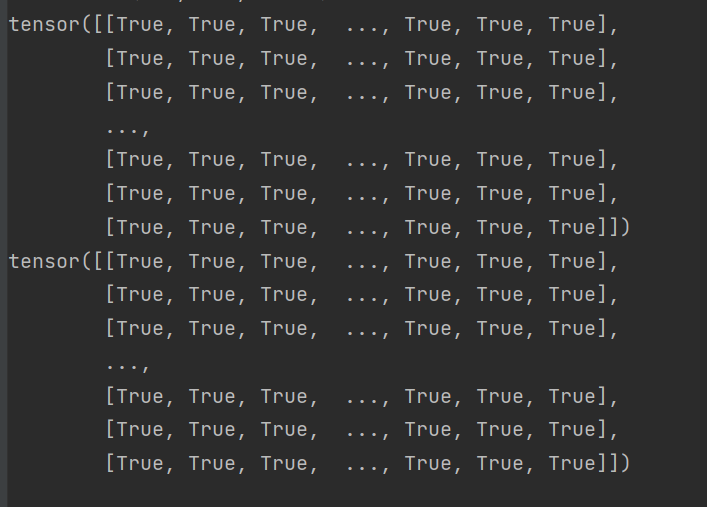
下面,我们通过一个简单的实验证明以上结论。
1
2
3
4
5
6
7
8
9
10
11
12
13
14
15
16
17
18
19
20
21
22
23
24
25
26
27
28
29
30
31
32
33
34
35
36
37
38
39
40
41
42
43
44
45
46
47
48
49
import torchfrom datasets import load_dataset from torch.utils.data import Datasetfrom torch.utils.data import DataLoaderimport torch.nn as nnimport matplotlib.pyplot as pltimport seaborn as snsfrom transformers import BertTokenizer, BertModelimport torch.optim as optimclass MydataSet (Dataset ): ... def collate_fn (data ): ... class BiLSTM (nn.Module): def __init__ (self, drop, hidden_dim, output_dim ): super (BiLSTM, self).__init__() self.drop = drop self.hidden_dim = hidden_dim self.output_dim = output_dim self.embedding = BertModel.from_pretrained('bert-base-chinese' ) for param in self.embedding.parameters(): param.requires_grad_(False ) self.lstm = nn.LSTM(input_size=768 , hidden_size=self.hidden_dim, num_layers=1 , batch_first=True , bidirectional=True , dropout=self.drop) self.fc = nn.Linear(self.hidden_dim * 2 , self.output_dim) def forward (self, input_ids, attention_mask, token_type_ids ): embedded = self.embedding(input_ids=input_ids, attention_mask=attention_mask, token_type_ids=token_type_ids) embedded = embedded.last_hidden_state out, (h_n, c_n) = self.lstm(embedded) print (out.shape) print (out[:, -1 , :768 ] == h_n[-2 , :, :]) print (out[:, 0 , 768 :] == h_n[-1 , :, :])
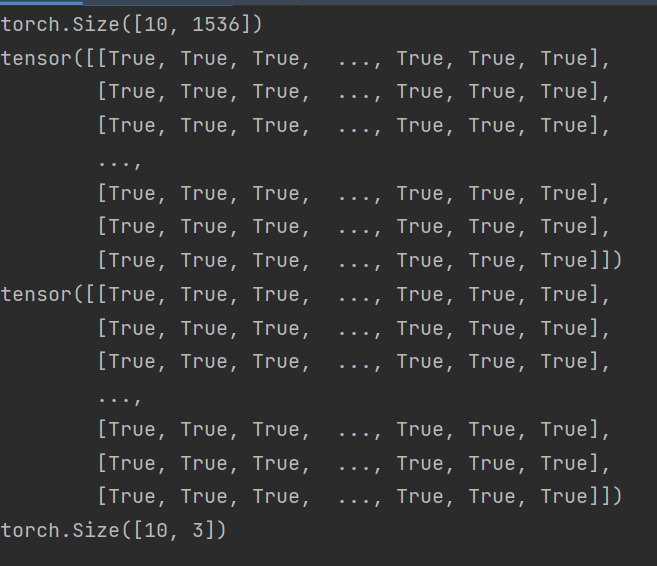
而我们现在同时需要正向lstm最后时刻的隐藏状态和反向lstm最后时刻的隐藏状态。于是,我们应该将两个hidden进行拼接作为输出。
生成层,forward编写与测试
修改刚才代码中的forward部分:
1
2
3
4
5
6
7
8
9
10
11
12
13
14
15
16
17
def forward (self, input_ids, attention_mask, token_type_ids ): embedded = self.embedding(input_ids=input_ids, attention_mask=attention_mask, token_type_ids=token_type_ids) embedded = embedded.last_hidden_state out, (h_n, c_n) = self.lstm(embedded) print (out.shape) output = torch.cat((h_n[-2 , :, :], h_n[-1 , :, :]), dim=1 ) print (output.shape) print (out[:, -1 , :768 ] == output[:, :768 ]) print (out[:, 0 , 768 :] == output[:, 768 :]) output = self.fc(output) return output
在主函数中检查forward输出的shape。为了快速实验,此处把batch_size修改为10。
1
2
3
4
5
6
7
8
9
10
11
12
if __name__ == '__main__' : batch_size = 10 epochs = 30 dropout = 0.4 rnn_hidden = 768 rnn_layer = 1 class_num = 3 lr = 0.001 ... out = model.forward(input_ids, attention_mask, token_type_ids) print (out.shape)
Step5:backward前置工作:将labels进行one-hot
这件事留到现在才来做,其实最开始就可以做这件事。作为多分类模型的基础,我们需要把
\[
\begin{split}
&class\_nums = 3,\\
&labels = [-1,-1,0,0,1,...]
\end{split}
\] 改成: \[
\begin{split}
&class\_nums = 3,\\
&labels = [[1,0,0],[1,0,0],[0,1,0],[0,1,0],[0,0,1]...]
\end{split}
\]
Pytorch提供了torch.nn.functional.one_hot用于将上述功能,但是注意,one_hot的input中不应该包含负数。在上篇中,我们观察了类别为-1,0,1,只需要对每项加一,就可以变成我们需要的。注意,对于更一般的情况,比如label为字符等,我们需要创建字典,将它们label to id得到对应的ids,再进行one-hot。
1 2 3 4 5 labels = torch.LongTensor([0 , -1 , 0 , 1 ]) labels += 1 one_hot_labels = one_hot(labels,num_classes = 3 ) print (one_hot_labels)
思考:我们需要一次性对所有labels进行onehot还是对一个batch进行呢?
显然,对一个batch进行labels to
onehot和对所有labels进行onehot效果是一样的。你可以选择先对所有labels做一个预处理,或者在批处理时一批一批的onehot。
考虑到内存等,这里我选择分批次处理。
Step5:Backward测试
1
2
3
4
5
6
7
8
9
10
11
12
13
if __name__ == '__main__' : ... for i, (input_ids, attention_mask, token_type_ids, labels) in enumerate (train_loader): one_hot_labels = one_hot(labels+1 , num_classes=3 ) one_hot_labels = one_hot_labels.to(dtype=torch.float ) optimizer.zero_grad() output = model.forward(input_ids, attention_mask, token_type_ids) loss = criterion(output, one_hot_labels) print (loss) loss.backward() optimizer.step()
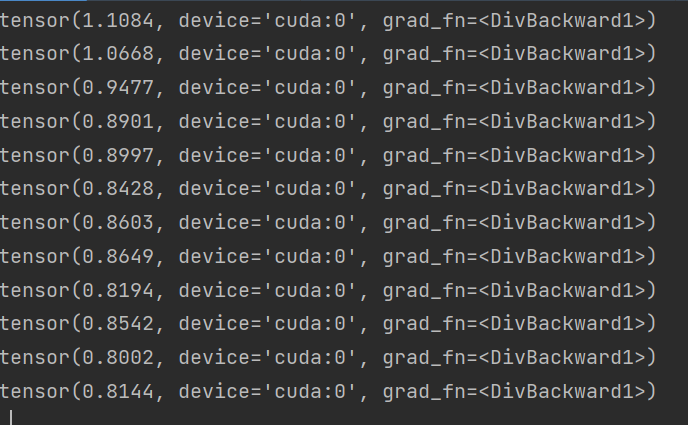
跑了一个批次,没报错,并且观察到loss在逐渐变小即可。
loss变化:
1 2 3 4 5 6 tensor(1.0854 , grad_fn=<DivBackward1>) tensor(1.2250 , grad_fn=<DivBackward1>) tensor(1.0756 , grad_fn=<DivBackward1>) tensor(0.9926 , grad_fn=<DivBackward1>) tensor(0.8705 , grad_fn=<DivBackward1>) tensor(0.8499 , grad_fn=<DivBackward1>)
ok,backward没问题。
但是很容易发现,计算速度太慢。于是下一步,我们需要将模型和数据放到GPU上运行。
第二部分:转移至GPU
关于gpu环境的搭建等就不再赘述。
检查gpu环境
1
2
3
4
5
if __name__ == '__main__' : device = torch.device('cuda' if torch.cuda.is_available() else 'cpu' ) print (device)
将cpu环境转换至gpu环境需要注意的地方
检查GPU是否可用: 首先需要检查系统中是否安装了CUDA以及GPU是否可用。可以使用torch.cuda.is_available()函数检查GPU是否可用。如果返回True,则说明GPU可以用于计算。将模型和数据移动到GPU: 将模型和数据迁移到GPU需要使用.to()方法。例如,可以使用model.to(device)将模型移动到GPU环境。同样,将张量移动到GPU也需要使用相同的方法,例如input.to(device)。使用合适的数据类型: GPU只能使用特定的数据类型进行计算。在PyTorch中,如果需要将模型和数据移动到GPU,需要使用FloatTensor()或LongTensor()等数据类型。一般来说,FloatTensor()用于浮点数计算,LongTensor()用于整数计算。注意内存使用情况: 在GPU环境下,需要注意内存使用情况。因为GPU的内存相对比较小,如果内存不足,程序可能会崩溃。在训练大型模型时,可以使用批处理(batching)的方法来减少内存占用。不要忘记将数据移回CPU: 在使用GPU进行计算后,需要将结果数据移回CPU环境,以便保存或进一步操作。可以使用.cpu()方法将结果数据移回CPU环境。
转移模型与数据
1
2
3
4
5
6
7
8
9
10
11
12
13
14
15
16
17
18
19
20
21
22
23
24
25
26
27
28
29
30
31
32
33
34
35
36
37
38
39
40
41
42
43
44
45
46
47
48
49
50
51
52
53
54
55
56
57
58
59
60
61
62
63
64
65
66
67
68
69
70
71
72
73
74
75
76
77
78
import torchfrom datasets import load_dataset from torch.utils.data import Datasetfrom torch.utils.data import DataLoaderimport torch.nn as nnimport matplotlib.pyplot as pltimport seaborn as snsfrom transformers import BertTokenizer, BertModelimport torch.optim as optimfrom torch.nn.functional import one_hotclass MydataSet (Dataset ): ... def collate_fn (data ): ... class BiLSTM (nn.Module): def __init__ (self, drop, hidden_dim, output_dim ): super (BiLSTM, self).__init__() ... self.embedding = BertModel.from_pretrained('bert-base-chinese' ) self.embedding.to(device) ... ... if __name__ == '__main__' : device = torch.device('cuda' if torch.cuda.is_available() else 'cpu' ) print ('device=' , device) ... train_dataset = MydataSet('./data/archive/train_clean.csv' , 'train' ) token = BertTokenizer.from_pretrained('bert-base-chinese' ) train_loader = DataLoader(dataset=train_dataset, batch_size=batch_size, collate_fn=collate_fn,shuffle=True ,drop_last=True ) model = BiLSTM(drop=dropout, hidden_dim=rnn_hidden, output_dim=class_num) model.to(device) criterion = nn.CrossEntropyLoss() optimizer = optim.AdamW(model.parameters(), lr=lr) for i, (input_ids, attention_mask, token_type_ids, labels) in enumerate (train_loader): input_ids = input_ids.long().to(device) attention_mask = attention_mask.long().to(device) token_type_ids = token_type_ids.long().to(device) labels = labels.long().to(device) one_hot_labels = one_hot(labels+1 , num_classes=3 ) one_hot_labels = one_hot_labels.to(dtype=torch.float ) optimizer.zero_grad() output = model.forward(input_ids, attention_mask, token_type_ids) loss = criterion(output, one_hot_labels) print (loss) loss.backward() optimizer.step()
可以看到损失在逐渐下降,并且速度提升了很多倍。并且device显示使用的cuda:0。
第三部分:Pytorch lightning
!改造结构
本来在这部分,我想完善epochs和batch的训练过程,并且记录loss和验证集的acc用于绘制图像,但在我写到一半是萌生了一个想法:有没有trainer?于是我去问了chat。它告诉我有个东西叫pytorch-lightning。里面就有trainer,可以便于我们管理我们的训练过程等。于是,我改变了这部分的目标。接下来,我们将学习如何使用pytorch-lightning改善我们结构,管理整理训练过程。
这个Lightning呢,最好是先去看看视频,然后跟着官方文档学。
参考教程
github:https://github.com/PyTorchLightning/pytorch-lightning
B站视频教学:使用PyTorch
Lightning简化PyTorch代码_哔哩哔哩_bilibili
官方文档 (超级有用):Basic
skills — PyTorch Lightning 2.1.0dev documentation
改造结构
现在我们新创建一个文件,copy已经写好的代码,准备用pytorch-ligting去改造它,避免改造过程中失误。这里只放最终改造结果,其实博主看着文档和教程一步步改造,用的时间很多。但是也越来越熟练。
注意:改造时加入了交叉验证,便于后续观察过拟合。
1
2
3
4
5
6
7
8
9
10
11
12
13
14
15
16
17
18
19
20
21
22
23
24
25
26
27
28
29
30
31
32
33
34
35
36
37
38
39
40
41
42
43
44
45
46
47
48
49
50
51
52
53
54
55
56
57
58
59
60
61
62
63
64
65
66
67
68
69
70
71
72
73
74
75
76
77
78
79
80
81
82
83
84
85
86
87
88
89
90
91
92
93
94
95
96
97
98
99
100
101
102
103
104
105
106
107
108
109
110
111
112
113
114
115
116
117
118
119
120
121
122
123
124
125
126
127
128
129
130
131
132
133
134
135
136
137
138
139
140
141
142
143
144
145
146
147
import torchfrom datasets import load_dataset from torch.utils.data import Datasetfrom torch.utils.data import DataLoaderimport torch.nn as nnfrom transformers import BertTokenizer, BertModelimport torch.optim as optimfrom torch.nn.functional import one_hotimport pytorch_lightning as plfrom pytorch_lightning import Trainerbatch_size = 128 epochs = 30 dropout = 0.4 rnn_hidden = 768 rnn_layer = 1 class_num = 3 lr = 0.001 class MydataSet (Dataset ): def __init__ (self, path, split ): self.dataset = load_dataset('csv' , data_files=path, split=split) def __getitem__ (self, item ): text = self.dataset[item]['text' ] label = self.dataset[item]['label' ] return text, label def __len__ (self ): return len (self.dataset) def collate_fn (data ): sents = [i[0 ] for i in data] labels = [i[1 ] for i in data] data = token.batch_encode_plus( batch_text_or_text_pairs=sents, truncation=True , padding='max_length' , max_length=200 , return_tensors='pt' , return_length=True , ) input_ids = data['input_ids' ] attention_mask = data['attention_mask' ] token_type_ids = data['token_type_ids' ] labels = torch.LongTensor(labels) return input_ids, attention_mask, token_type_ids, labels class BiLSTMClassifier (nn.Module): def __init__ (self, drop, hidden_dim, output_dim ): super (BiLSTMClassifier, self).__init__() self.drop = drop self.hidden_dim = hidden_dim self.output_dim = output_dim self.embedding = BertModel.from_pretrained('bert-base-chinese' ) for param in self.embedding.parameters(): param.requires_grad_(False ) self.lstm = nn.LSTM(input_size=768 , hidden_size=self.hidden_dim, num_layers=2 , batch_first=True , bidirectional=True , dropout=self.drop) self.fc = nn.Linear(self.hidden_dim * 2 , self.output_dim) def forward (self, input_ids, attention_mask, token_type_ids ): embedded = self.embedding(input_ids=input_ids, attention_mask=attention_mask, token_type_ids=token_type_ids) embedded = embedded.last_hidden_state out, (h_n, c_n) = self.lstm(embedded) output = torch.cat((h_n[-2 , :, :], h_n[-1 , :, :]), dim=1 ) output = self.fc(output) return output class BiLSTMLighting (pl.LightningModule): def __init__ (self, drop, hidden_dim, output_dim ): super (BiLSTMLighting, self).__init__() self.model = BiLSTMClassifier(drop, hidden_dim, output_dim) self.criterion = nn.CrossEntropyLoss() self.train_dataset = MydataSet('./data/archive/train_clean.csv' , 'train' ) self.val_dataset = MydataSet('./data/archive/val_clean.csv' , 'train' ) def configure_optimizers (self ): optimizer = optim.AdamW(self.parameters(), lr=lr) return optimizer def forward (self, input_ids, attention_mask, token_type_ids ): return self.model(input_ids, attention_mask, token_type_ids) def training_step (self, batch, batch_idx ): input_ids, attention_mask, token_type_ids, labels = batch y = one_hot(labels + 1 , num_classes=3 ) y = y.to(dtype=torch.float ) y_hat = self.model(input_ids, attention_mask, token_type_ids) loss = self.criterion(y_hat, y) self.log('train_loss' , loss, prog_bar=True , logger=True , on_step=True , on_epoch=True ) return loss def train_dataloader (self ): train_loader = DataLoader(dataset=self.train_dataset, batch_size=batch_size, collate_fn=collate_fn, shuffle=True ) return train_loader def validation_step (self, batch, batch_idx ): input_ids, attention_mask, token_type_ids, labels = batch y = one_hot(labels + 1 , num_classes=3 ) y = y.to(dtype=torch.float ) y_hat = self.model(input_ids, attention_mask, token_type_ids) loss = self.criterion(y_hat, y) self.log('val_loss' , loss, prog_bar=True , logger=True , on_step=True , on_epoch=True ) return loss def val_dataloader (self ): val_loader = DataLoader(dataset=self.val_dataset, batch_size=batch_size, collate_fn=collate_fn, shuffle=False ) return val_loader if __name__ == '__main__' : token = BertTokenizer.from_pretrained('bert-base-chinese' ) trainer = Trainer(max_epochs=2 , limit_train_batches=10 , limit_val_batches=5 , log_every_n_steps=1 , accelerator='gpu' , devices="auto" ) model = BiLSTMLighting(drop=dropout, hidden_dim=rnn_hidden, output_dim=class_num) trainer.fit(model)
注意这里max_epochs=2,limit_train_batches=10, limit_val_batches=5是在测试训练,不是正式训练。
关于绘图工具
这里把绘图工具也换成了tensorbroad,这是一款可以根据日志绘制准确率、loss等的工具。在安装了pytorch-lightning后,会自动安装。用法简单。
这里只贴启动代码:
1 tensorboard --logdir=path/to/log/directory
注意等号两边不要留空格。
训练测试
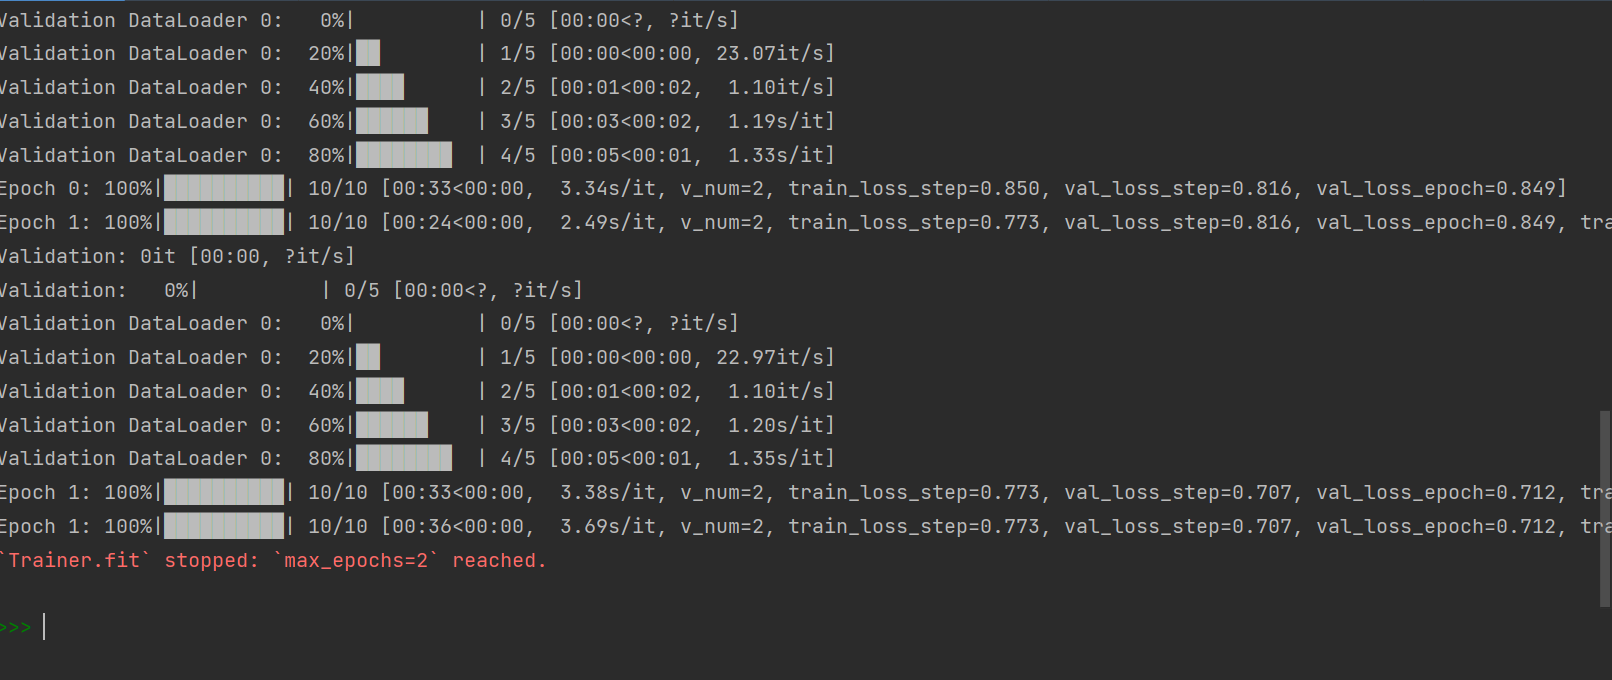
上述代码trainer只用了一小部分数据集进行测试,先来看看控制台输出:
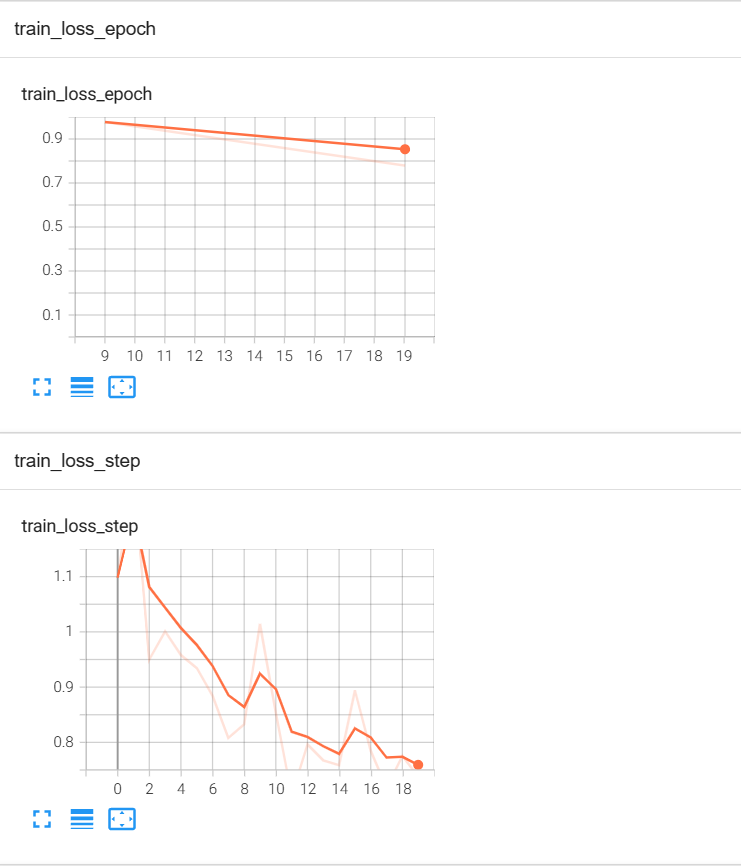
打开transboard的Web UI:
可以看到train_loss_step在按照我们期望的方式下降。
第四部分:正式训练
该部分训练时间接近三小时,是本次实验的第一次训练。现在给出超参数:
1
2
3
4
5
6
7
8
batch_size = 128 epochs = 10 dropout = 0.4 rnn_hidden = 768 rnn_layer = 1 class_num = 3 lr = 0.001
不建议读者跟着一起训练,因为之后有改进版。只需要修改main,就可以正式训练.
1
2
3
4
5
6
7
8
if __name__ == '__main__' : token = BertTokenizer.from_pretrained('bert-base-chinese' ) trainer = Trainer(max_epochs=epochs, log_every_n_steps=10 , accelerator='gpu' , devices="auto" ,fast_dev_run=False ) model = BiLSTMLighting(drop=dropout, hidden_dim=rnn_hidden, output_dim=class_num) trainer.fit(model)
too years later......
这篇文章没有讲到模型保存,代码里也没写,但是不用担心,pytorch
lightning
会帮我们自动保存,下篇会详细介绍如何保存训练过程中最好的模型,以及模型如何读取与测试。
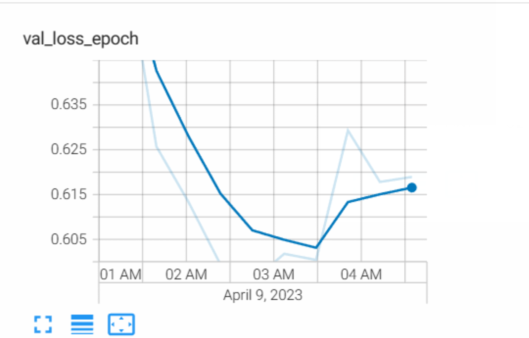
第一次训练完毕。现在来看看我们tarin_loss和val_loss:
可以看到train loss依然在下降,但是val
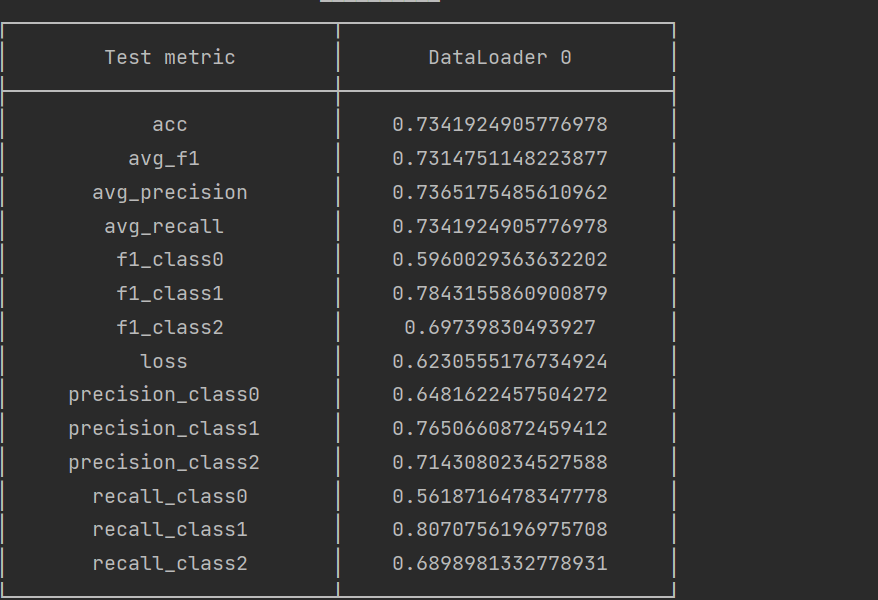
loss却已经开始上升。说明训练到后来,模型过拟合了,这也是为什么我们要接着调整超参数并进行第二次训练的原因。但这些是下一篇文章的内容。这里先剧透一下,这次训练的模型拿去做测试,评估结果如下:
第一次训练的测试结果
这个结果在竞赛排行榜上排在28名的位置(评估标准为f1score)。
关于如何测试,如何解决过拟合等,将在下一篇文章中说明。
